
WordPressでカスタムフィールドを扱うプラグインとしては「Advanced Custom Fields」(略して「ACF」とも呼ばれる)が有名ですが、最近は「Smart Custom Fields」というプラグインを使っています。
基本的には管理画面で入力フィールドの定義をすればそれでOKですが、ローカル環境(開発環境)で作って、本番環境に移すことを考えると、項目数が多くなると結構ツライことになります。
(フィールド定義のエクスポート・インポート機能がないようなので…)
ただ、フィールド定義をPHPコード上で行う方法があるようなので、そのフィルターフック・関数の使い方をまとめておこうと思います。
目次
Smart Custom Fieldsのフィールドをテーマ側で定義する

Smart Custom Fieldsはコードベースでカスタムフィールドの定義ができるようになっているので、テーマのfunctions.phpなどで入力項目の定義が可能です。

どうやって使うのかな?と軽く調べてみたところ…
カスタムフィールドを定義する配列で使える項目は
まとめるのが面倒なので…プラグインのコードを直接確認してみてください(/plugins/smart-custom-fields/classes/fields/*)
という、わかりみしかない1文が書いてあったので、コードを眺めて自分でまとめてみたいと思います。
Smart Custom Fieldsの設定項目を追加する
編集項目が表示される部分(メタボックス)の追加
まずはSmart Custom Fieldsで入力域の大枠を追加する部分です。
/**
 * カスタムフィールドを定義
 *
 * @param array  $settings  MW_WP_Form_Setting オブジェクトの配列
 * @param string $type      投稿タイプ or ロール
 * @param int    $id        投稿ID or ユーザーID
 * @param string $meta_type post | user
 * @return array
 */
function my_smart_cf_register_fields( $settings, $type, $id, $meta_type ) {
    // SCF::add_setting( 'ユニークなID', 'メタボックスのタイトル' );
    $setting = SCF::add_setting( 'scf-meta1', 'Smart Custom Fieldsの設定項目' );
    $settings[] = $setting;
    return $settings;
}

add_filter( 'smart-cf-register-fields', 'my_smart_cf_register_fields', 10, 4 );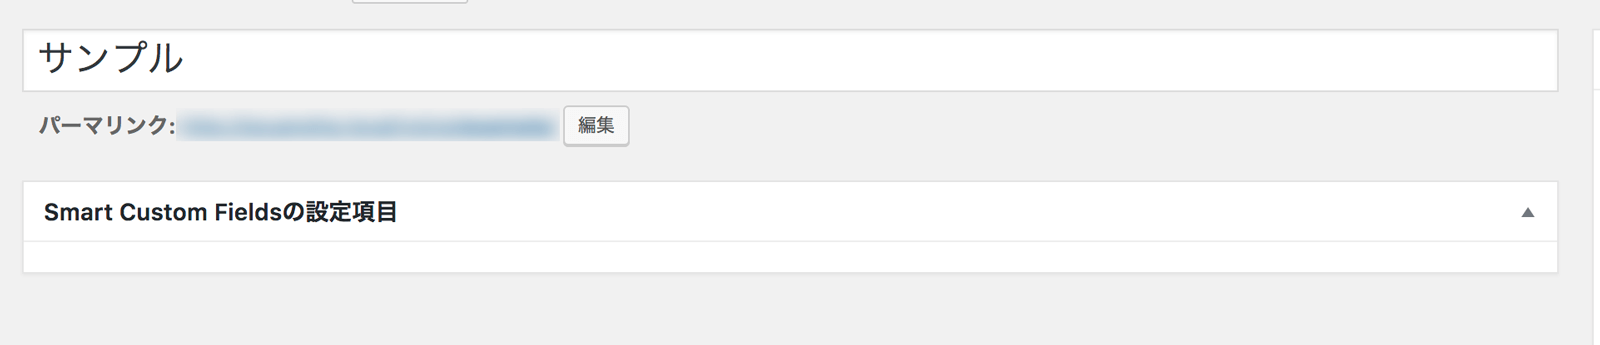
これでひとまず編集画面に編集項目が表示される部分(メタボックス)が表示されます。
入力項目の追加
入力項目はSCF::add_settingで追加した設定に対してadd_groupでグループ・項目の追加をします。
function my_smart_cf_register_fields( $settings, $type, $id, $meta_type ) {
    // SCF::add_setting( 'ユニークなID', 'メタボックスのタイトル' );
    $setting = SCF::add_setting( 'scf-meta1', 'Smart Custom Fieldsの設定項目' );
    $fields = array();
    // $setting->add_group( 'ユニークなID', 繰り返し可能か, カスタムフィールドの配列 );
    $setting->add_group( 'group-id', false, $fields );
    $settings[] = $setting;
    return $settings;
}

add_filter( 'smart-cf-register-fields', 'my_smart_cf_register_fields', 10, 4 );編集項目は上のコード内の$fields配列にいろいろ定義していく形になります。
(とりあえず上のコードをコピペして必要な部分をカスタマイズすれば楽だぞ!未来の俺!)
例えば、テキスト項目を追加する場合は次のような例になります。
function my_smart_cf_register_fields( $settings, $type, $id, $meta_type ) {
    // SCF::add_setting( 'ユニークなID', 'メタボックスのタイトル' );
    $setting = SCF::add_setting( 'scf-meta1', 'Smart Custom Fieldsの設定項目' );
    $fields = array(
        array(
            'name'  => 'text-1',
            'label' => 'これはテキストフィールドです',
            'type'  => 'text',
        ),
    );
    // $setting->add_group( 'ユニークなID', 繰り返し可能か, カスタムフィールドの配列 );
    $setting->add_group( 'group-id', false, $fields );
    $settings[] = $setting;
    return $settings;
}

add_filter( 'smart-cf-register-fields', 'my_smart_cf_register_fields', 10, 4 );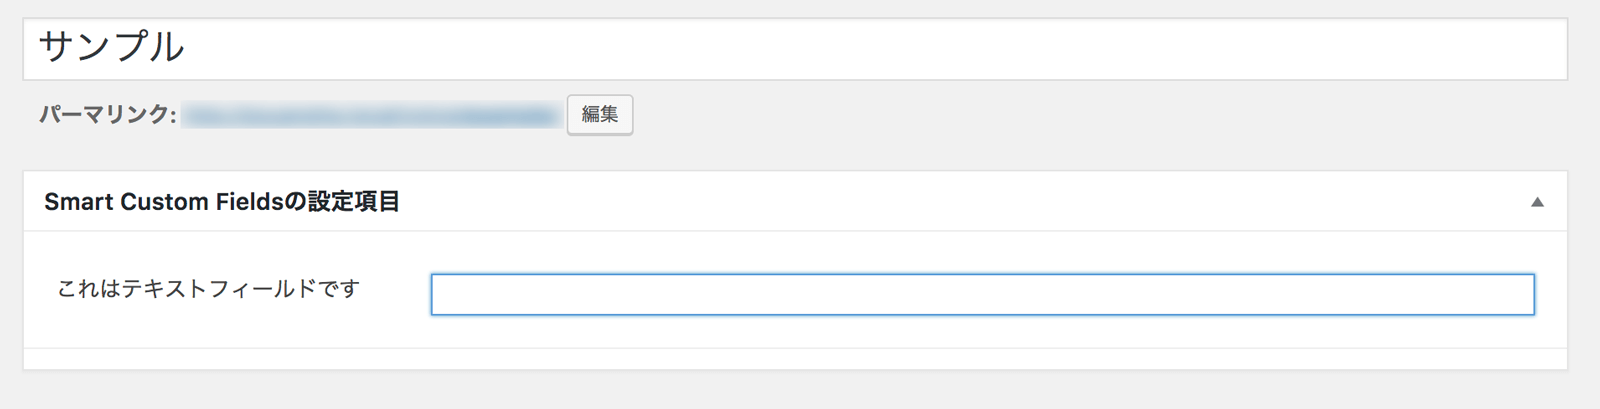
入力項目が表示されました!
特定のカスタム投稿タイプのみフィールドを追加する
カスタム投稿タイプによって振り分けを行う場合は、$typeと$meta_typeを使って条件判定します。
function my_smart_cf_register_fields( $settings, $type, $id, $meta_type ) {

    if ( 'post' == $meta_type && 'my_post_type' == $type ) {
        // SCF::add_setting( 'ユニークなID', 'メタボックスのタイトル' );
        $setting = SCF::add_setting( 'scf-meta1', 'Smart Custom Fieldsの設定項目' );
        $fields  = array(
            array(
                'name'  => 'text-1',
                'label' => 'これはテキストフィールドです',
                'type'  => 'text',
            ),
        );
        // $setting->add_group( 'ユニークなID', 繰り返し可能か, カスタムフィールドの配列 );
        $setting->add_group( 'group-id', false, $fields );
        $settings[] = $setting;
    }

    return $settings;
}

add_filter( 'smart-cf-register-fields', 'my_smart_cf_register_fields', 10, 4 );
カスタムフィールドの定義まとめ
それではここから、各フィールド定義を作るための配列の指定方法をまとめていきます…
各タイプの識別子はこちら▼
(クリックすると各定義部分に移動します)
テキストフィールド
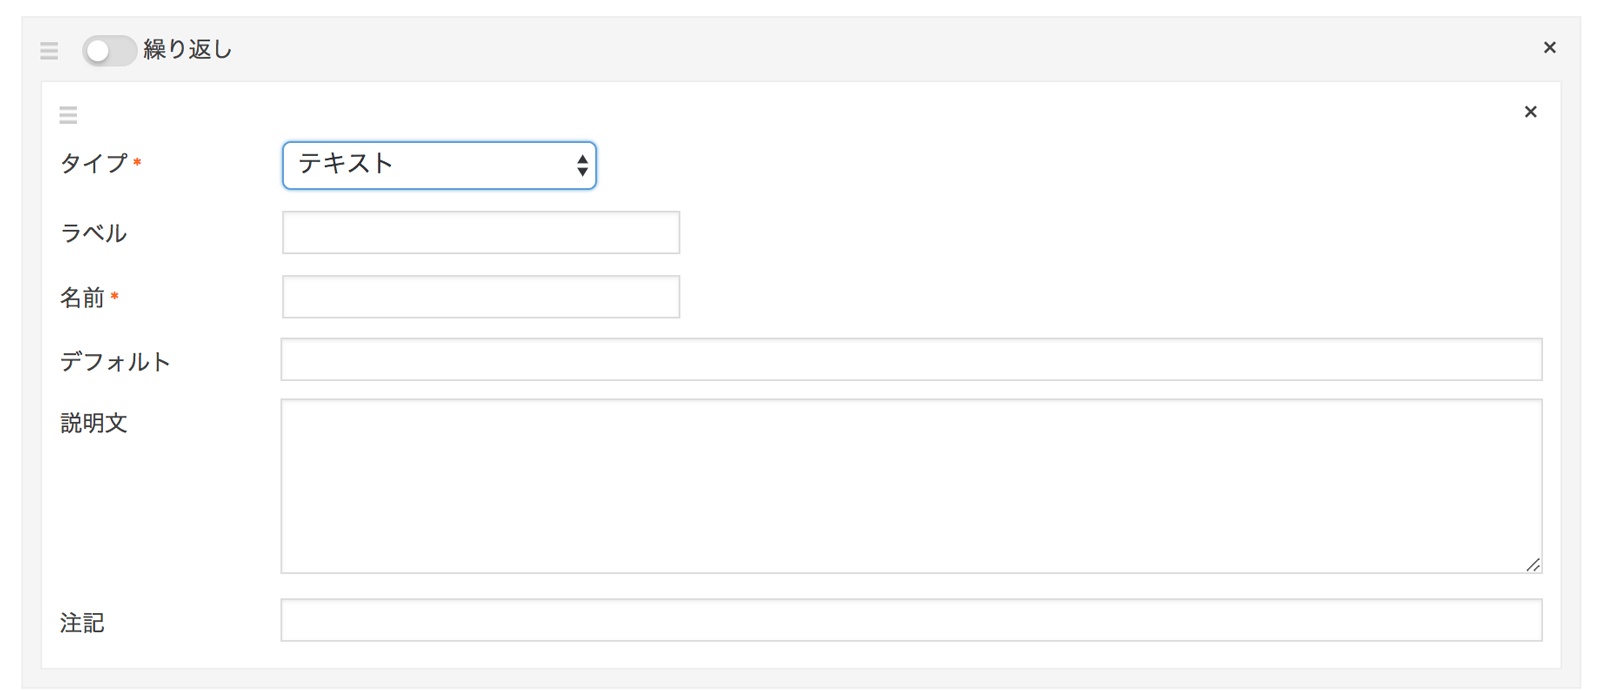
array(
    'type'        => 'text', //*タイプ
    'name'        => 'name', //*名前
    'label'       => 'label', //ラベル
    'default'     => 'default', //デフォルト
    'instruction' => 'instruction', //説明文
    'notes'       => 'notes', //注記
),テキストエリア
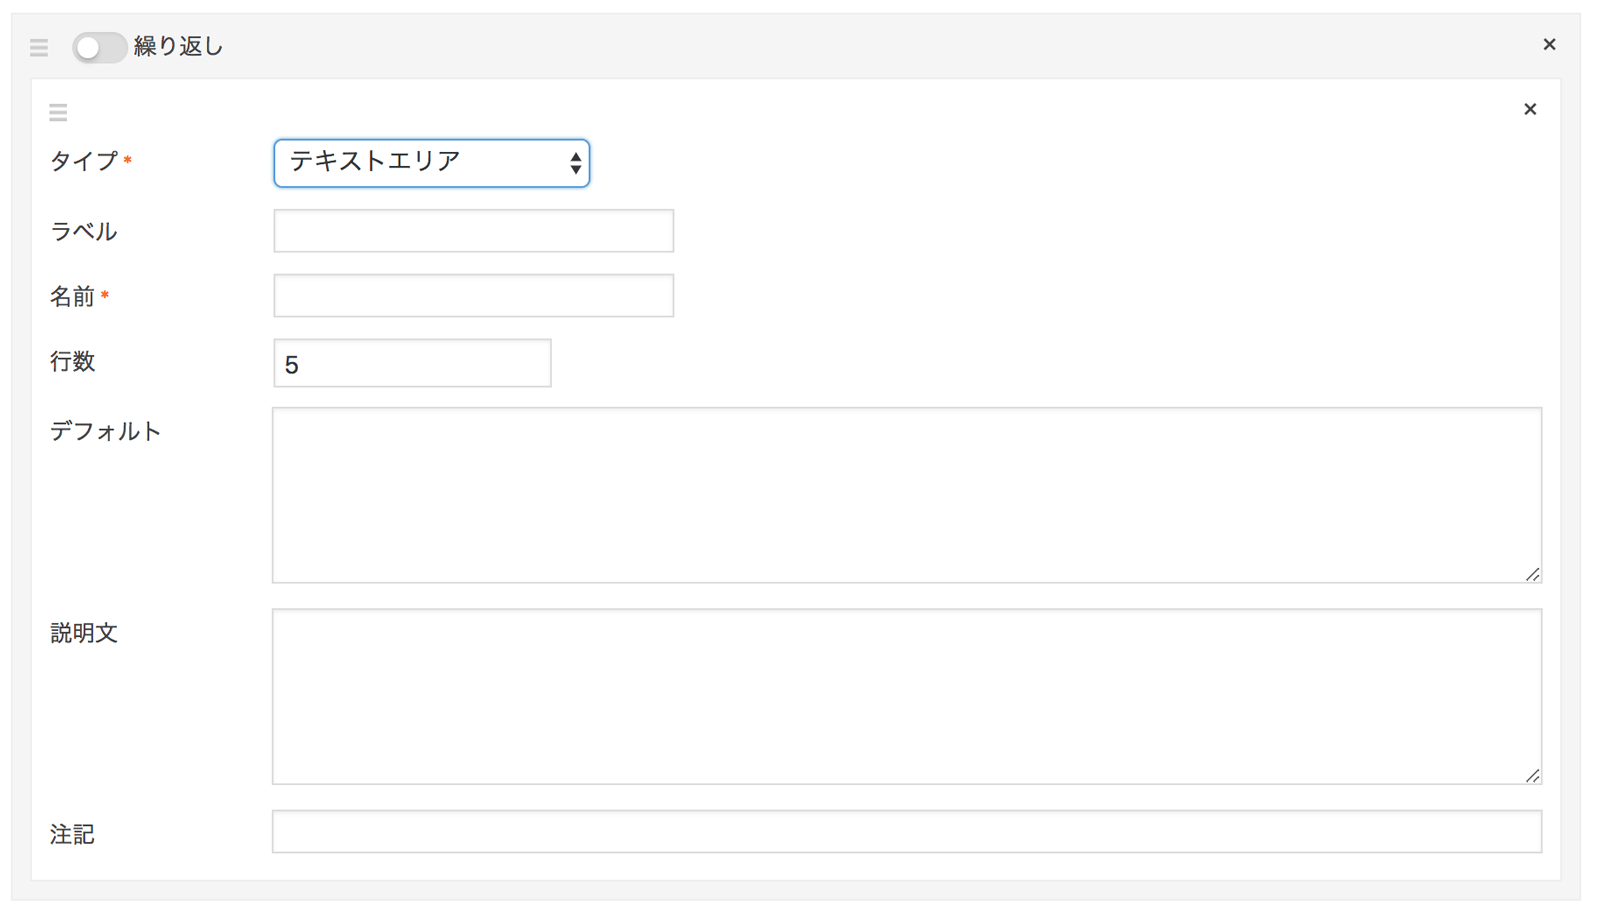
array(
    'type'        => 'textarea', //*タイプ
    'name'        => 'name', //*名前
    'label'       => 'label', //ラベル
    'rows'        => 5, //行数
    'default'     => 'default', //デフォルト
    'instruction' => 'instruction', //説明文
    'notes'       => 'notes', //注記
),真偽値
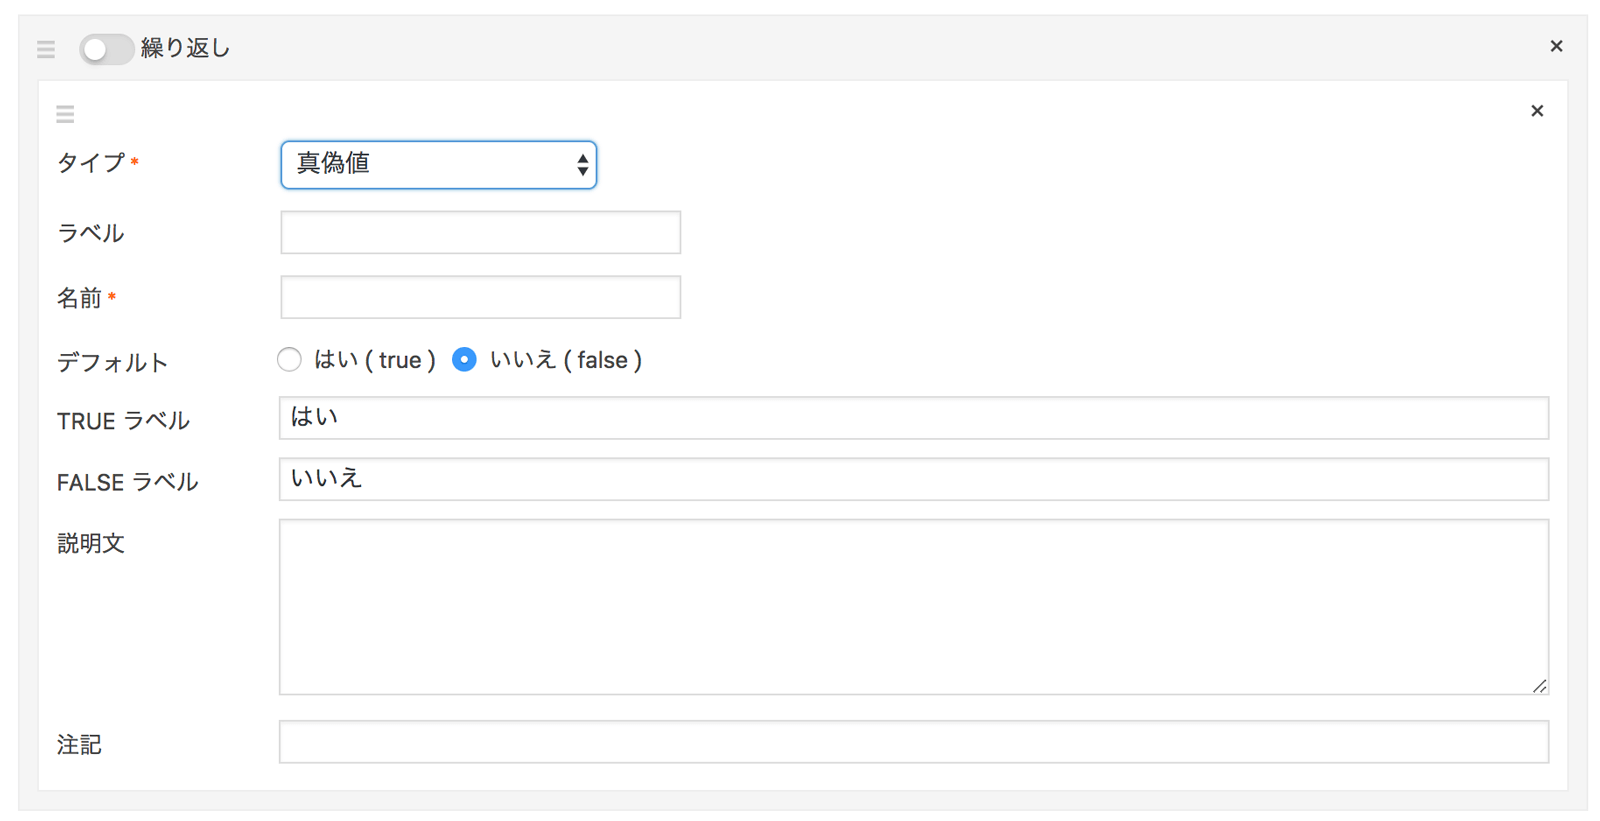
array(
    'type'        => 'boolean', //*タイプ
    'name'        => 'name', //*名前
    'label'       => 'label', //ラベル
    'default'     => 0, //デフォルト
    'true_label'  => 'Yes', //TRUE ラベル
    'false_label' => 'No', //FALSE ラベル
    'instruction' => 'instruction', //説明文
    'notes'       => 'notes', //注記
),メッセージ
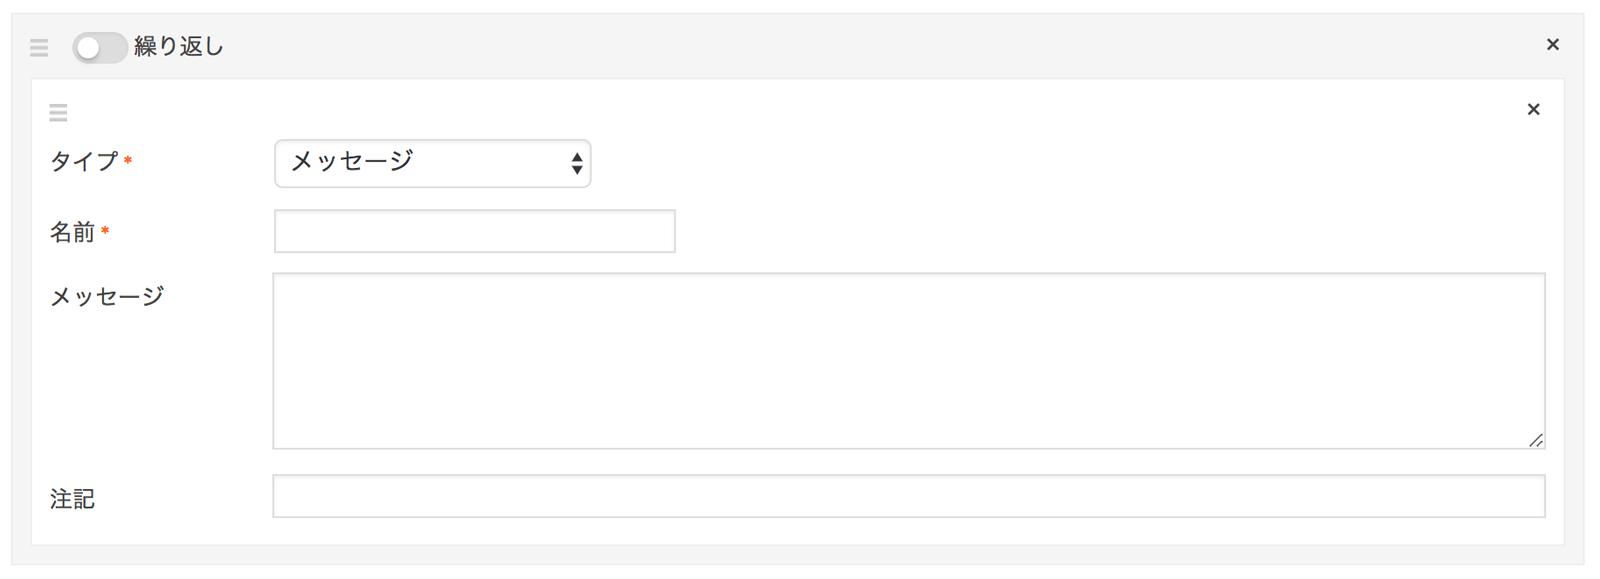
array(
    'type'        => 'message', //*タイプ
    'name'        => 'name', //*名前
    'default'     => 'message', //メッセージ
    'notes'       => 'notes', //注記
),チェックボックス
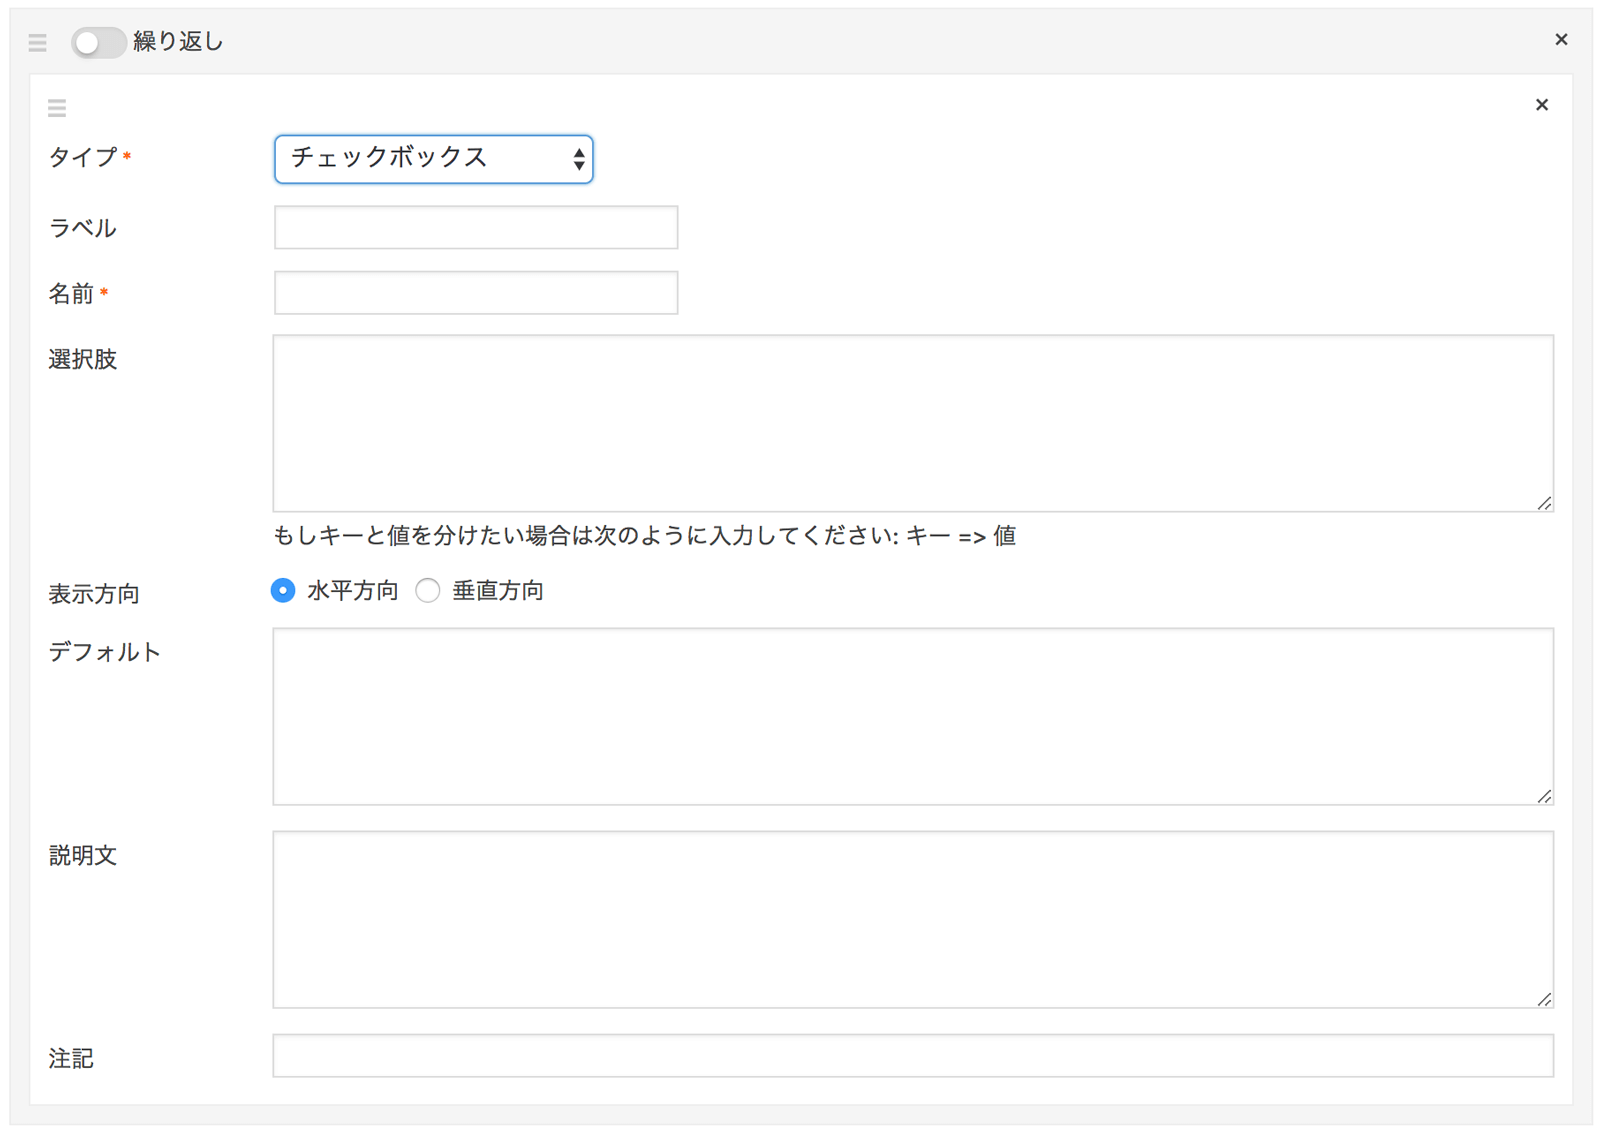
array(
    'type'    => 'check', //*タイプ
    'name'    => 'name', //*名前
    'label'   => 'label', //ラベル
    'choices' => array(
        'key1' => '選択肢1',
        'key2' => '選択肢2'
    ), // 選択肢
    'check_direction' => 'horizontal', // 表示方向( horizontal or vertical )
    'default' => array(
        'key1',
        'key2'
    ), //デフォルト
    'instruction' => 'instruction', //説明文
    'notes'   => 'notes', //注記
),ラジオボタン
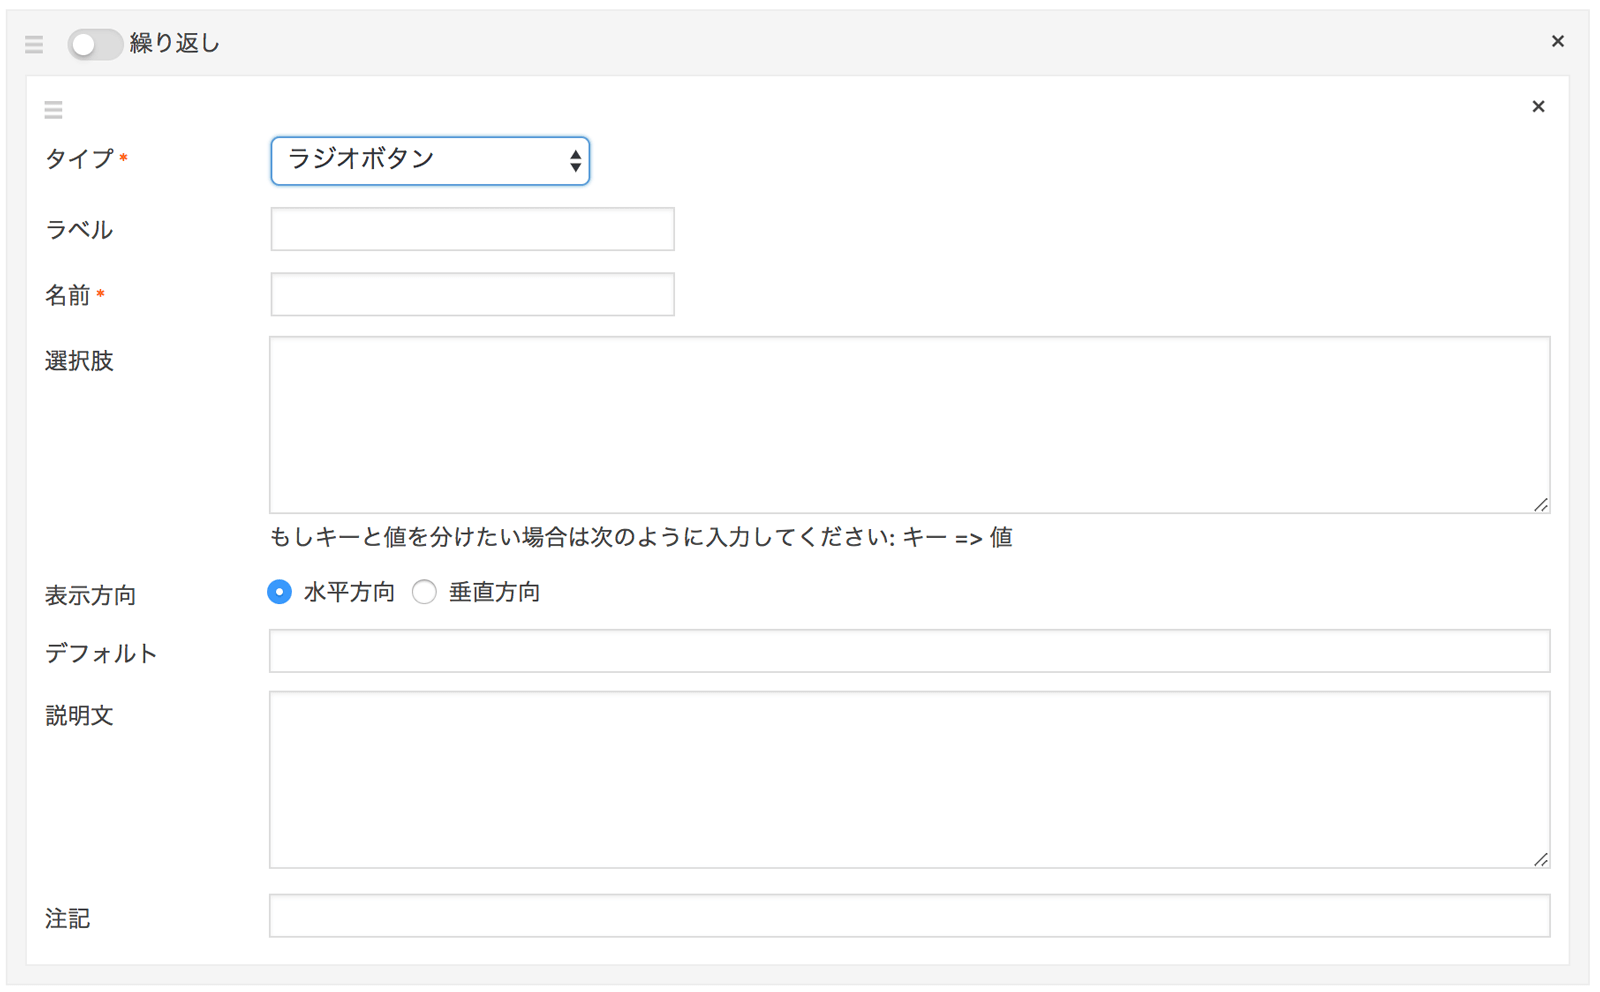
array(
    'type'            => 'radio', //*タイプ
    'name'            => 'name', //*名前
    'label'           => 'label', //ラベル
    'choices'         => array(
        'key1' => '選択肢1',
        'key2' => '選択肢2'
    ), // 選択肢
    'radio_direction' => 'horizontal', // 表示方向( horizontal or vertical )
    'default'         => 'key1', //デフォルト
    'instruction'     => 'instruction', //説明文
    'notes'           => 'notes', //注記
),セレクトボックス
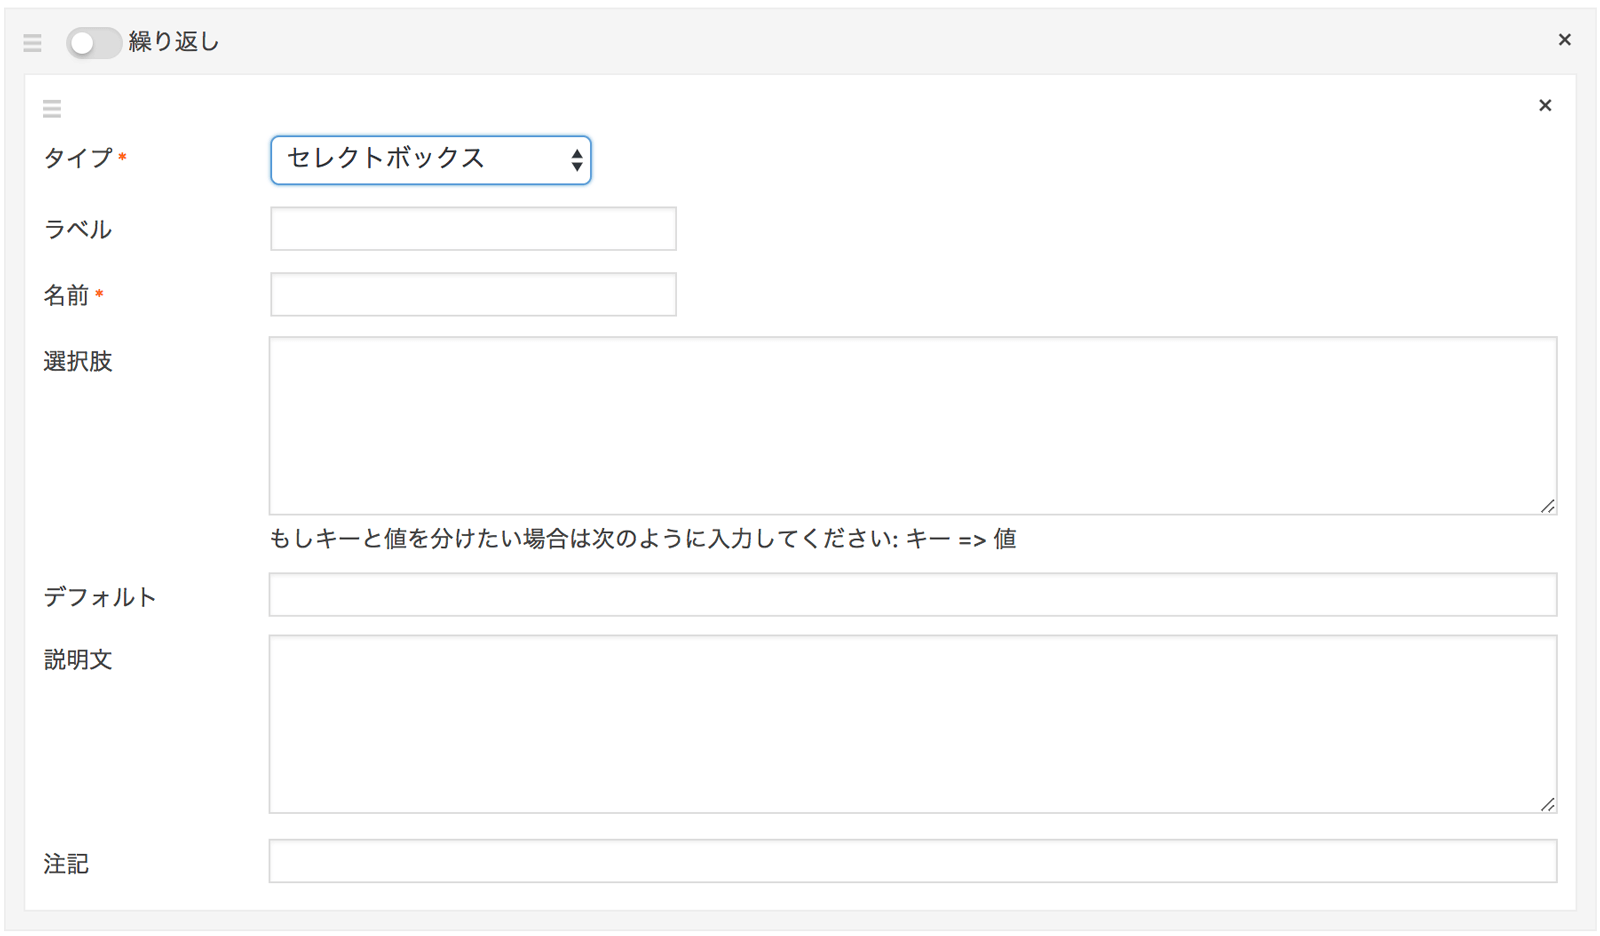
array(
    'type'            => 'select', //*タイプ
    'name'            => 'name', //*名前
    'label'           => 'label', //ラベル
    'choices'         => array(
        'key1' => '選択肢1',
        'key2' => '選択肢2'
    ), // 選択肢
    'default'         => 'key1', //デフォルト
    'instruction'     => 'instruction', //説明文
    'notes'           => 'notes', //注記
),ファイル

array(
    'type'        => 'file', //*タイプ
    'name'        => 'name', //*名前
    'label'       => 'label', //ラベル
    'instruction' => 'instruction', //説明文
    'notes'       => 'notes', //注記
),画像
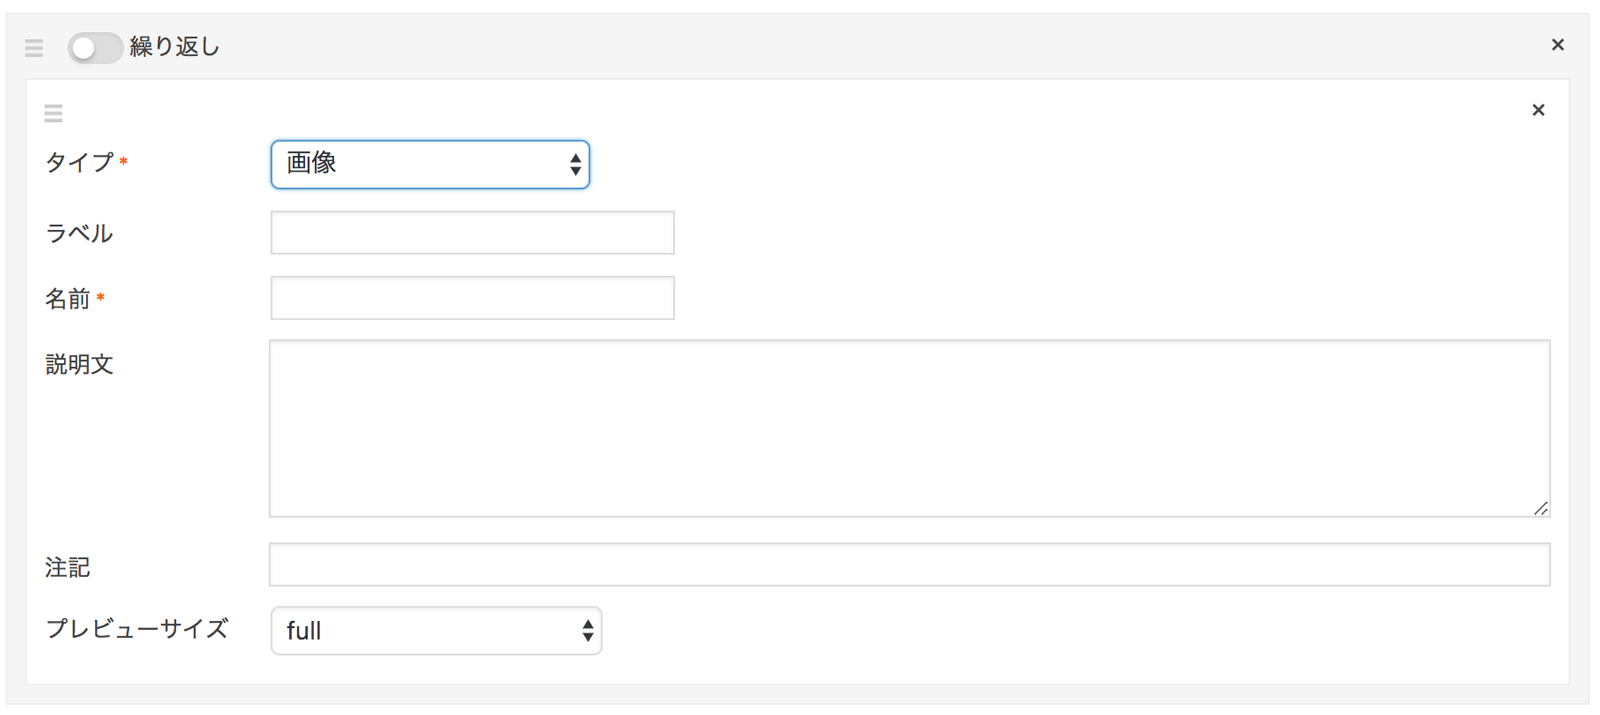
array(
    'type'        => 'image', //*タイプ
    'name'        => 'name', //*名前
    'label'       => 'label', //ラベル
    'instruction' => 'instruction', //説明文
    'notes'       => 'notes', //注記
    'size'        => 'full' // プレビューサイズ
),WYSIWYG
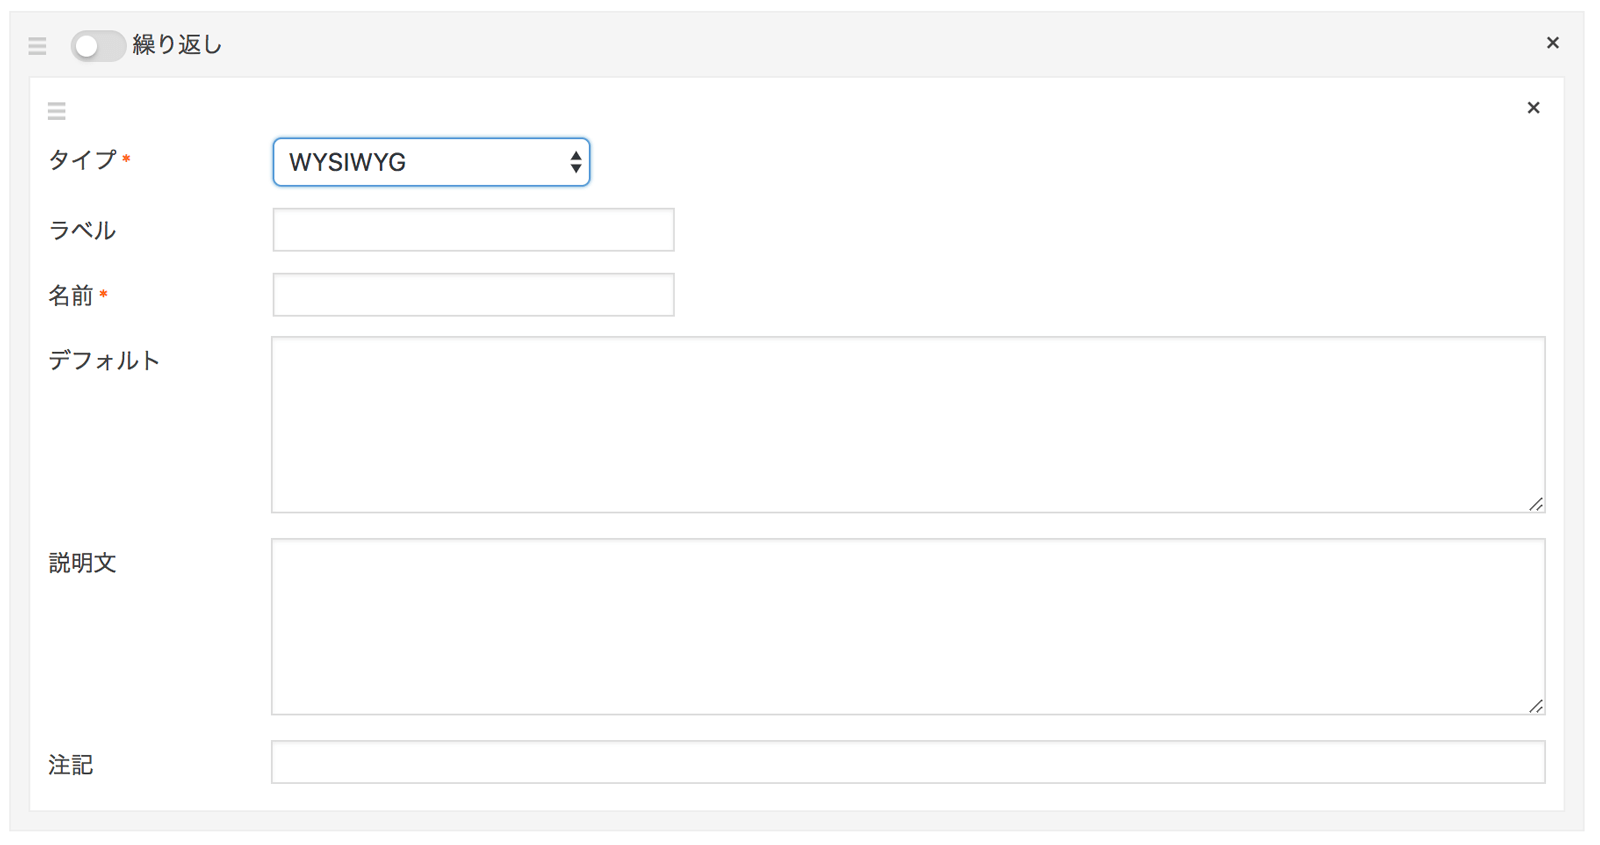
array(
    'type'        => 'wysiwyg', //*タイプ
    'name'        => 'name', //*名前
    'label'       => 'label', //ラベル
    'default'     => 'default', //デフォルト
    'instruction' => 'instruction', //説明文
    'notes'       => 'notes', //注記
),カラーピッカー
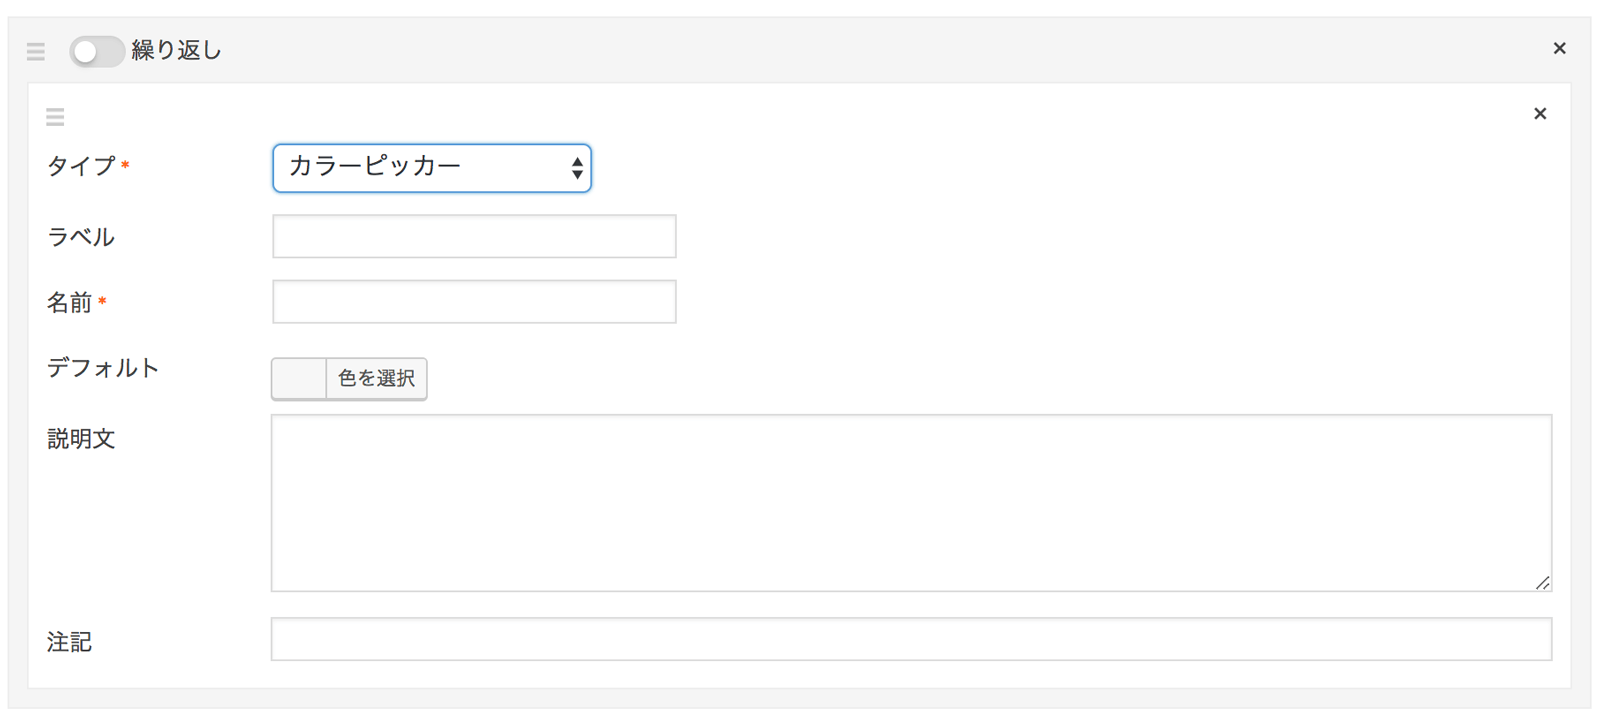
array(
    'type'        => 'colorpicker', //*タイプ
    'name'        => 'name', //*名前
    'label'       => 'label', //ラベル
    'default'     => '#000000', //デフォルト
    'instruction' => 'instruction', //説明文
    'notes'       => 'notes', //注記
),日付ピッカー

array(
    'type'        => 'datepicker', //*タイプ
    'name'        => 'name', //*名前
    'label'       => 'label', //ラベル
    'default'     => '01/01/2018', //デフォルト
    'date_format' => 'dd/mm/yy', // 日付のフォーマット
    'max_date'    => '+10d', // 最大日付
    'min_date'    => '-10d', // 最小日付
    'instruction' => 'instruction', //説明文
    'notes'       => 'notes', //注記
),時刻付き日付ピッカー
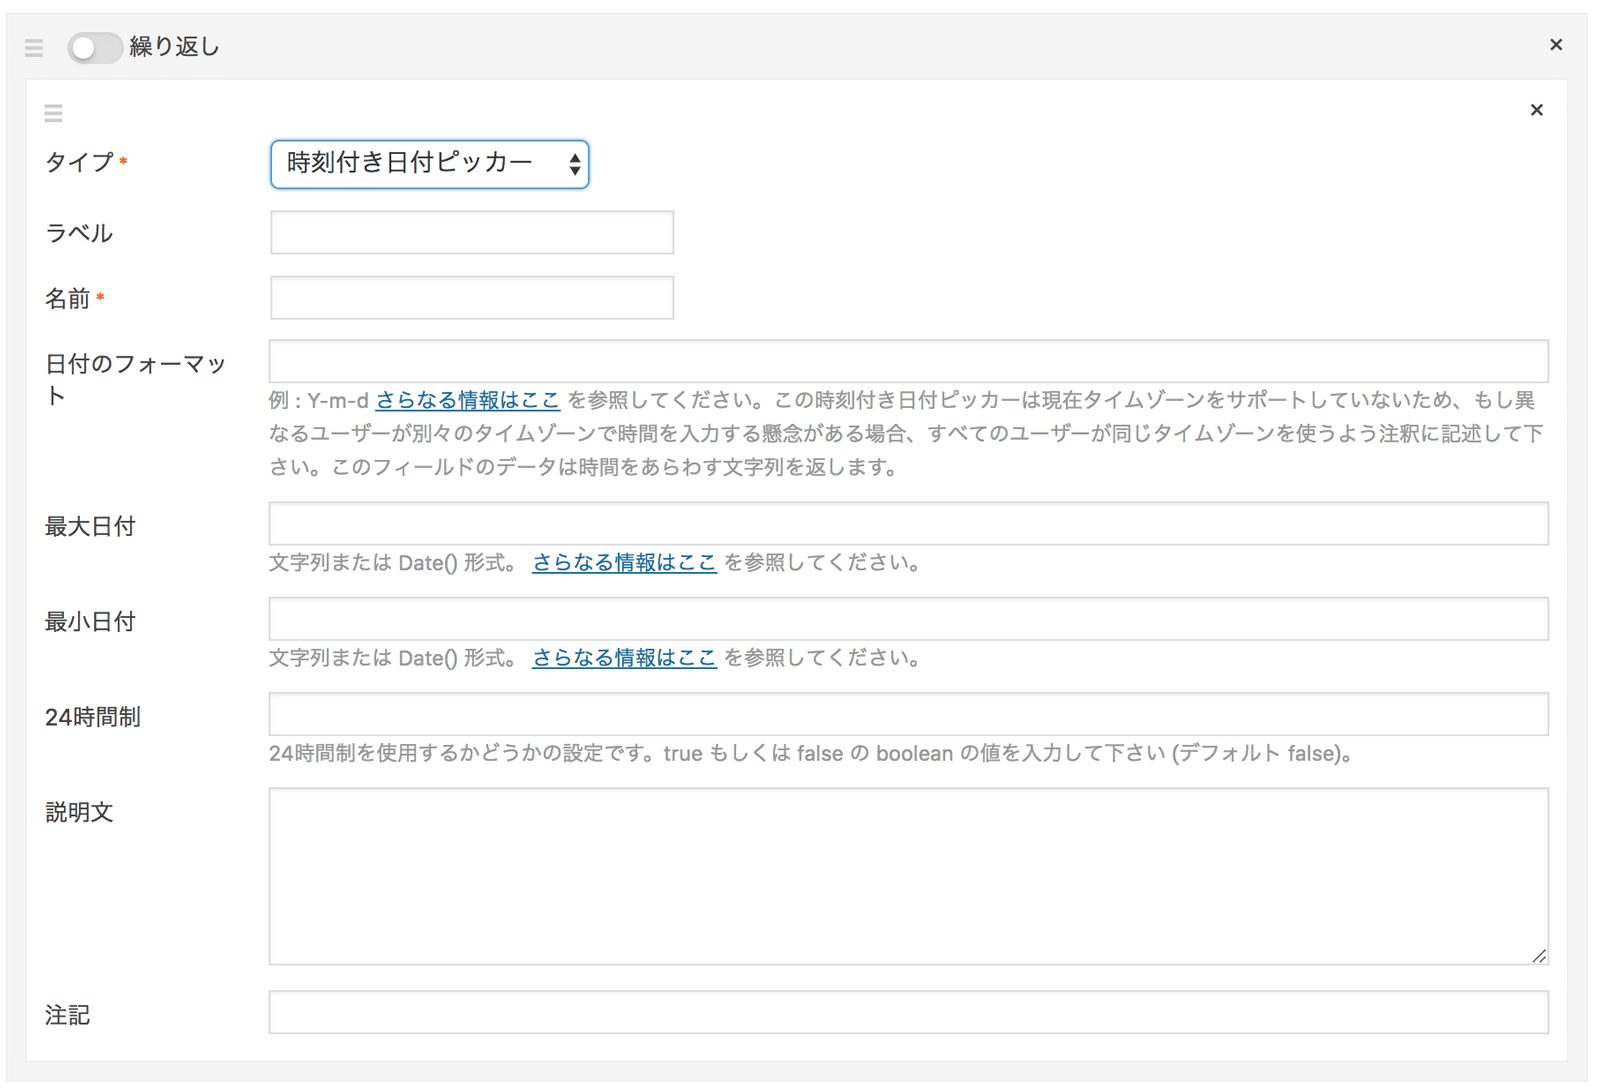
array(
    'type'        => 'datetime_picker', //*タイプ
    'name'        => 'name', //*名前
    'label'       => 'label', //ラベル
    'default'     => '2018-01-01', //デフォルト
    'date_format' => 'Y-m-d h:i K', // 日付のフォーマット
    'max_date'    => '2018-12-31', // 最大日付
    'min_date'    => '2018-01-01', // 最小日付
    'time_24hr'   => false, // 24時間制
    'instruction' => 'instruction', //説明文
    'notes'       => 'notes', //注記
),関連する投稿
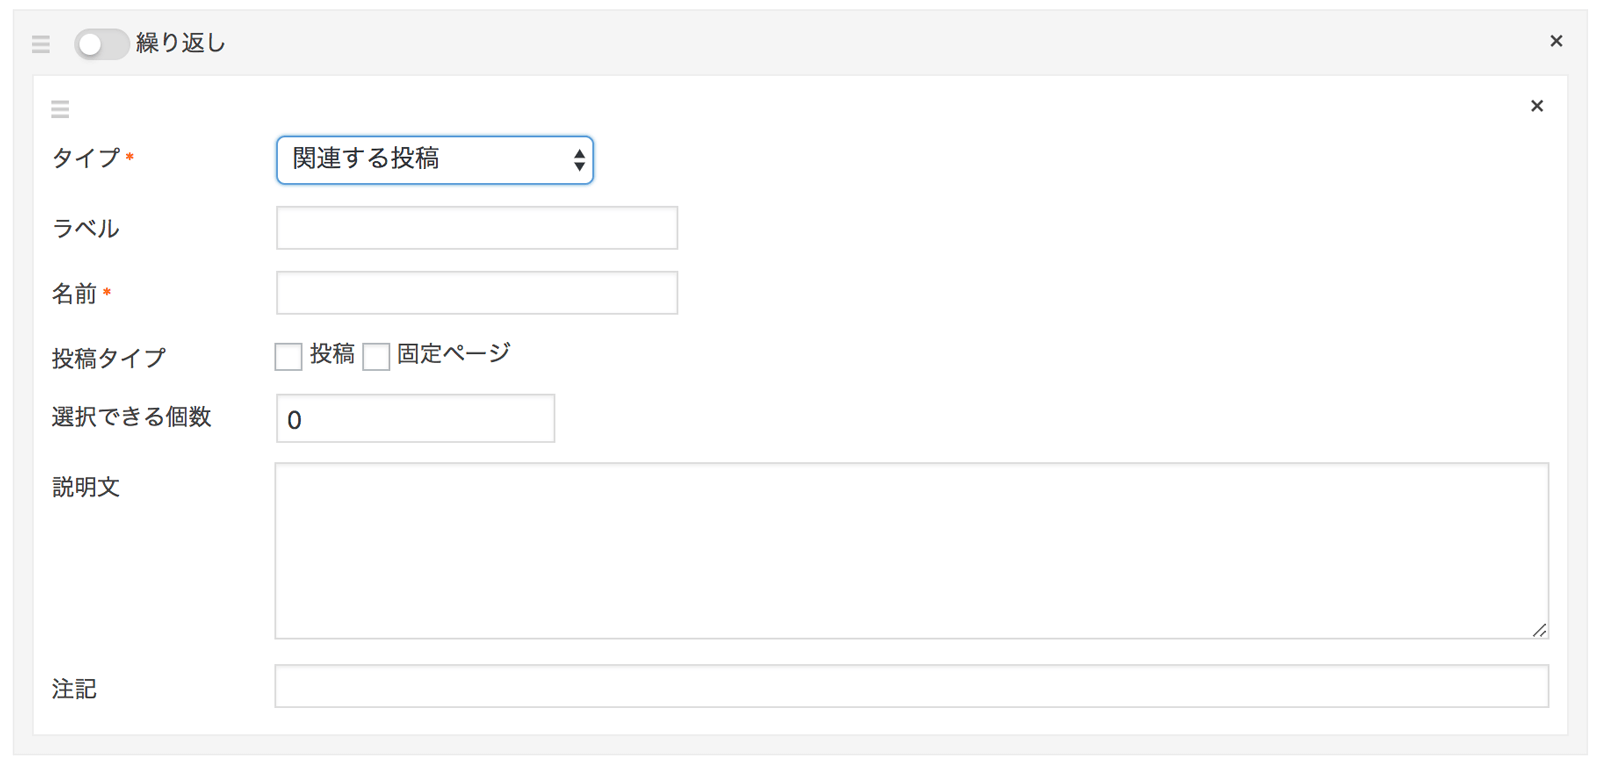
array(
    'type'        => 'relation', //*タイプ
    'name'        => 'name', //*名前
    'label'       => 'label', //ラベル
    'post-type'   => array( 'post', 'page' ), //投稿タイプ
    'limit'       => 0, // 選択できる個数
    'instruction' => 'instruction', //説明文
    'notes'       => 'notes', //注記
),関連するターム(カテゴリー・タグ・カスタムタクソノミー)
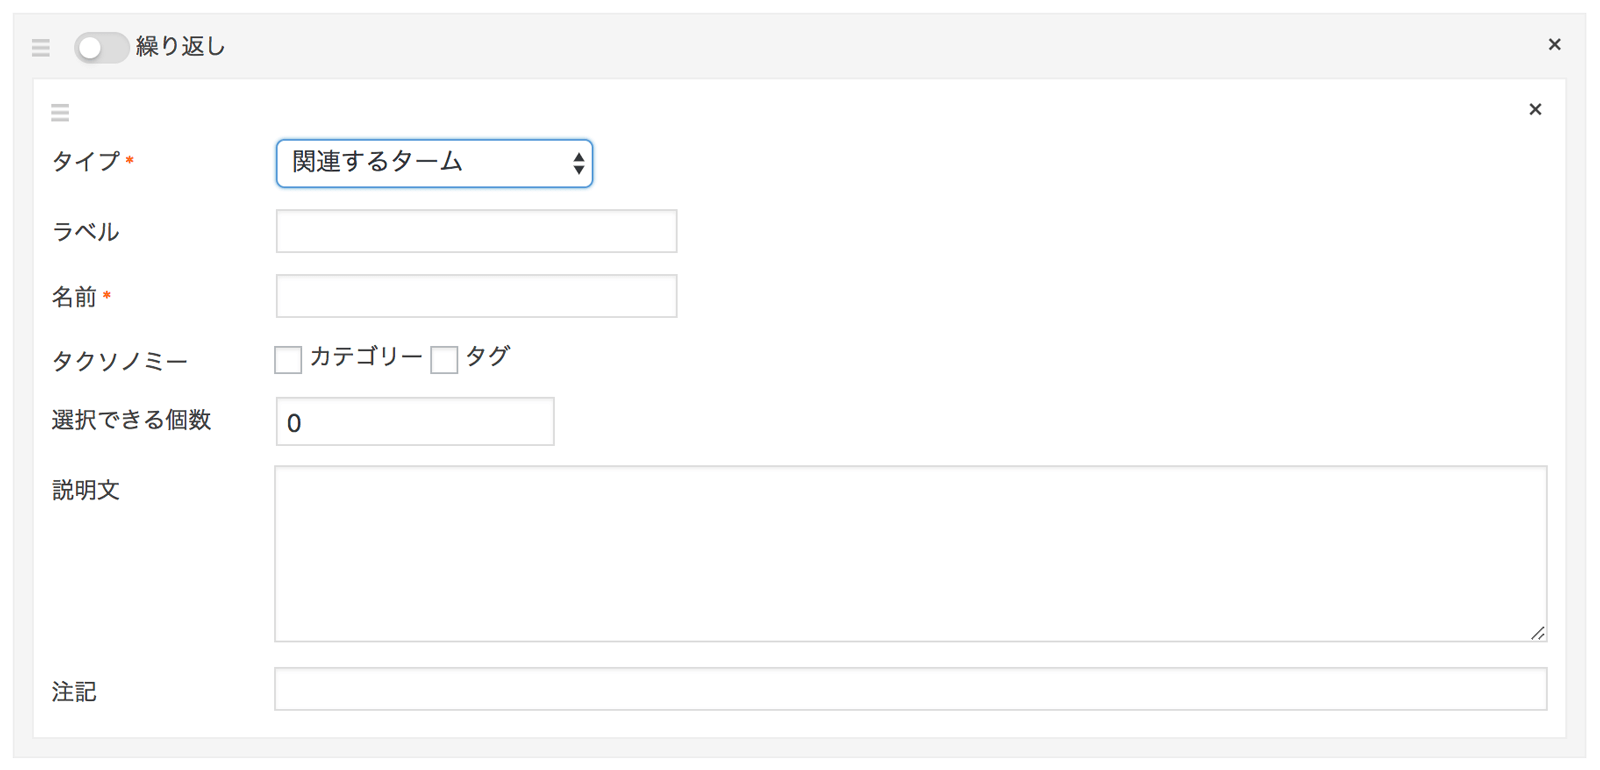
array(
    'type'        => 'taxonomy', //*タイプ
    'name'        => 'name', //*名前
    'label'       => 'label', //ラベル
    'taxonomy'    => array( 'category', 'post_tag' ), //タクソノミー
    'limit'       => 0, // 選択できる個数
    'instruction' => 'instruction', //説明文
    'notes'       => 'notes', //注記
),カスタムフィールド値の取得方法
定義したカスタムフィールドへの入力内容を取得する方法についてはこちら▼
// 単一のフィールド
$value = SCF::get( $field_name, $post_id );

// リピートあり 返却値は配列
$value = SCF::get( $group_name, $post_id );
SCF クラスの getメソッドで取得できます。ループ内であれば投稿IDを省略しても取得可能です。
さいごに
ACFでは有料プラグインとなっている繰り返しフィールドも作れるので非常に助かってます!
あと、管理画面でフィールドを作っているときに、名前はそのままタイプだけ変えようとすると、名前までクリアされてやや面倒なのでコード上でやったほうが楽ですね(汗
もしお役に立ちそうならご活用下さい。
ではまた。